Friday, 13 September 2013

Easy Tutorial Root Kindle Fire HD 8.9

Today, we offer you a short but intuitive Guide, which will allow you to enable root, namely the admin on the recent economical tablet home Amazon, we are talking about the Kindle Fire HD 8.9.
Before proceeding, we want you to the premise that we android root guide assume no responsibility for damage, perform the following at your own risk. To do this you need to download a tool, and some drivers.Look great android
tutorial root Kindle Fire HD 89

Requirements To root Kindle Fire HD 8.9

downloadable Kinlde Fire Driver
Download Binary Root Tool from Q U paste this url to browser http://adf.ly/Ge45Q

If you have another kindle version read on : how to root kindle fire hd 7

Root Kindle Fire HD 8.9 Process
ok now lets start the root process to your kindle fire
  1. First, you need to extract the tool previously downloaded to a directory of your choice
  2. Enable usb debugging on your kindle settings menu > security, ADB
  3. Connect the tablet to the PC and wait until the drivers are installed automatically, so if it weren't simply indicate the location where the downloaded driver
  4. Run as administrator the RunMe
  5. As soon as you open a DOS window, type 2 and then 1
  6. Wait until the end of the process and restart the device

Congratulations, if you followed the tutorial exactly the same as i have mentioned above and haven't encountered any kind of problem, you should have root permissions on your kindle fire.

Now the question arises. But what is the root? Why enable it? The answer is really quite simple, enable root permissions, will let on your device you can install and run any application such as Link2Sd which allows you to move the app on an external card. Having administrator privileges, it will be like to be a developer, have access to everything! Highly recommended as a procedure, because after a certain time space in your internal memory will be fulled with installed application!

Thursday, 12 September 2013

Samsung Galaxy S4 and other improvements planned for 2013

After the first rumors about the future of smartphone tip of South House, the Galaxy S4, the latest rumors said that Samsung would already be at work on three new devices to market in 2013. Among these, the Samsung Galaxy S4, codenamed Project J, a version more competitive in economic terms of Samsung Galaxy Note2 , finally, and a tablet that is supposed to represent the direct rival of the Asus Transformer Pad Infinity TF700T. Look great android

samsung galaxy s4 display

Samsung Plans in 2013

On previously post we have discussed about rumor of galaxy s4 launch at end of february 2013. The South Korean company, now leader of the smartphone market, would choose Project J as a codename for use internally to call the Samsung Galaxy S4 which is expected to be formally announced in the coming month of April 2013, again anticipating the release of rival. The new rumors, though, don't add more information about the hardware of the new Android smartphone but, as reported previously, this device should be characterized by a display Super AMOLED Full HD from 5 inches with resolution of 1920 x 1080 pixels, offering a display of high-quality content, should be equipped with a processor Quad Core 5450 Exynos from 2 GHz with Cortex-A15 and a camera with 13 megapixelsensor. The display size, then, would switch to 5.0 inches, versus the current 4.8 inches of Samsung Galaxy S3.

Samsung New Android Device

Among the novelties planned for 2013, a device not yet confirmed is a Variant of Galaxy Note 2 that Samsung should introduce only in European territory. Apparently, the South Korean company to save costs and be able to propose a cheaper device, will employ for this version a less powerful hardware than that used for the current Galaxy Note 2, already available in stores, and could remove the feature S-Pen and the entire suite of applications for this pen, which made famous the phablet Samsung with animated by Android. Samsung could then deal with the Galaxy Note 2 that he has already done with the Galaxy S3, indeed such smartphones already exist in the Galaxy S3 Mini, sold at lowest price in order to attract a greater number of users.

Finally, the novelties offered by Samsung, would expect thearrival in 2013 of a tablet which would compete directly with Transformer of Asus products. Apparently Samsung has noticed the success of the series of tablet branded Asus found on the market and would like to follow suit by launching a product designed to increase the sales of rival devices and other Android tablet. The rumor want tablet from Samsung would be able to be transformed from tablet to netbook in a few steps and, according to rumors reported so far, the technique should include a 13.3-inch display with optional keyboard dock.

Conclusion

In short, the intentions of Samsung plans for the 2013 promise important innovations on their new android smartphone and tablet, and the South Korean company wants to impose itself in every area of size, from that of smartphones, tablet and netbook, via the middle ground of phablet.

Tuesday, 10 September 2013

Easy Tutorial Install ClockWorkMod Recovery For Sony Xperia Sola

Sony Xperia Sola is announced at end of march 2012, and its become one of the Sony smartphone flagship model, in this post i will show you my experience on install custom recovery and this time i choose clockworkmod recovey for my Sony Xperia Sola. But Before you start install cwm recovery on your sony xperia sola first you need to unlock the bootloader first. Look great android

install cwm recovery on xperia sola

Unlock Bootloader Sony Xperia Sola

Actually Sony Officially has released the procedure to unlock the bootloader, although it is from sony but you must note that it still will void the warranty. If you want to get back the warranty you can flash the stock rom / firmware. Then you will get back the warranty. Here is the official tutorial from sony :

In practice, this procedure can be official unlock the bootloader to other smartphones such as the Xperia P, and Xperia U

Once you have unlocked the bootloader on your smartphone, you can for example change the recovery, like by install CWM Recovery on your sony xperia phone, so you can install an alternative firmware or custom rom


How To install CWM Recovery On Sony Xperia Sola

If you want to try the ClockworkMod recovery on your Sony Xperia Sola but don't know how to do, today we offer the complete guide, it is also quite simple.

In this case, in fact, after unlocking the bootloader using the Guide found at the beginning of the article, what you need to do is install a modified kernel that already includes the recovery inside.
The installation is quite simple, as long as we have already said, I have already unlocked bootloader.
  1. Download the kernel file to your device
  2. Download fastboot then install
  3. copy the file and put the file to your fastboot installation folder
  4. Rename the file with the name "kernel.elf"
  5. connect your smartphone to your Windows PC with USB charging cable
  6. Open a command prompt from where you place the kernel file, by press shift + right click open command prompt here, and type: fastboot flash boot kernel.elf
  7. At this point type, always from the command prompt on Windows, the command :
    fastboot reboot.
  8. In this way your smartphone will restart and you will be free to use the new recovery to change firmware.
Read also: root sony xperia u on ics

thanks to forum xda developers that give the very helpfull guide
Well, we've seen together how to unlock the bootloader and recovery change on Sony Xperia Sola
At this point I suggest you search on XDA to find some interesting firmware to install on your smartphone using the recovery you just installed.

Monday, 9 September 2013

Tutorial Restore Eee Pad Transformer TF101 To Original Firmware

Today comes the long awaited update to Android 4.0 ICS for the excellent Asus tablet the Eee Pad Transformer TF101. To complete the upgrade to Android Ice Cream sandwich or also known as ICS, please note that you will need the original firmware version installed on your asus tablet and not a custom rom / custom firmware because otherwise it will be impossible to update to the latest Android release, issued by the Asus company. So to update to android ics you first must flash orirginal stock rom if you have installed custom rom before.Look great android

restore eee pad transformer tf 101 to original rom

Now below i will show you in a few simple steps to restore to original rom factory default rom for Eee Pad Transformer TF101:

Requirements


  • Download the official update from Asus site
  • Have at least 1 Gb MicroSD
  • The tablet can have any ROMs.
  • please note when you do this it will also delete your phone memory so you must backup all your phone data
  • Do nandroid Backup just in case if anything goes wrong you can change back to your latest state.


Restore Eee Pad Transformer TF101 To Factory Default ROM 

  1. Once you have downloaded the firmware, unpack it and you will have a new folder called ASUS.
  2. Copy this folder in MicroSD.
  3. Reboot into Recovery.
  4. Made various wipe partition, wipe cache, and dalvik
  5. Install the previously copied to the SD file, which is located in ASUS.
  6. Reboot and you will have the initial installation as if it had been switched on for the first time.

Once you have done all these steps above, then finally you'll be able to update Transformer TF101 to Ice Cream Sandwich.

Sunday, 8 September 2013

Android ICS Launcher Style: Apex Launcher Review

Here Today i will give reiew that maybe will be the best android launcher for your android ice cream sandwich. After the Trebuchet and Nova Launcher created by the team of CyanogenMod which already available on XDA. Now there is another new android ICS launcher available from a couple days ago on the Play Store, it is another good alternative to the usual launcher of Android ICS. We're talking about the Apex Launcher, available in a few days in beta version on XDA and now has finally reached a final version with high degree of stability, this launcher expected will surpass the two aforementioned competitors.Look great android

Apex Launcher Review

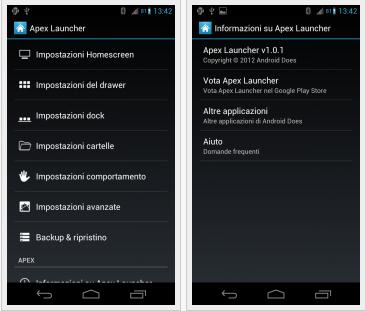
What is the different between Apex Launcher compared to Nova and the Trebuchet? More customizations, greater fluency with all effects enabled, all Italian localization and gestures on the home, which are absent in the Trebuchet and Nova are chargeable. In the Drawer, or the part where it displays the system and applications installed on your device, in addition to the applications tab and the tab Widget that we have in ICS stock Launcher, developers have created a new tab with only downloaded applications as we can see from the screenshot:
android ics launcher


Apex Launcher For ICS Features


Obviously the only requirement needed is having flashed onto your smartphone any Rom with Android 4.0.x.
But we see in detail the numerous functions that gives us this awesome Launcher:

apex launcher with ics style


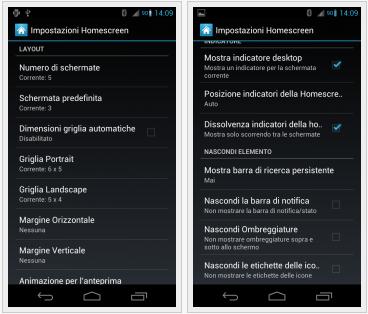
HomeScreen Settings: In this section you can edit to your liking, the Home of the device, adding or changing screens, changing transitions screen scroll, hide the google search bar and much more.

apex launcher for ics

Drawer settings: In this section you can configure the Drawer. You have the option to hide applications that do not want to display, change the transition as home, hide the labels of the app and widget, change the transparency of the background of the Drawer, and even hide the Widgets, applications downloaded or the card with all applications. Obviously there is much more but would not a single article.
apex launcher review


Dock Settings: Here we simply set the settings for the dock icons below the separator bar on the home. We can also choose to hide the dock to use more space on the screen to install the icons and widgets.

Folder Settings: the settings for folders. As we want to display the thumbnails, or if we want to hide the folder names or icons in the folders. Very useful.

Behavior settings: In this section you can set the behavior of the virtual keys and we can finally also set gestures to our pleasure. Fundamental function.


Advanced Settings: Here you can set the language of the launcher, if we want to resize any widget and customize the menu at Apex Launcher, adding or removing options.

Please Note
If you want to use the insert function of widgets like Android 4.0, you need to be root user. Then simply download the apk from this link, and with a root manager any move the downloaded apk in/system/app and restart the device. Otherwise with a long press on the home screen opens the Insert menu widget.

Read Also : Download Android Launcher Collection

Conclusion

by alternative and complete in the Market there are many different Android Launcher, and all are very good as the Go Launcher that we reviewed in this article : Download Steel Go Launcher. But if you like Android 4.0 theme and I like to have a full and free Launcher that will satisfy your then try the Apex Launcher won't disappoint.

Download Apex Launcher From Playstore
If you want to download is apk file read : download apk from google play

Thursday, 5 September 2013

Google Play Magazines Launched for UK By Google

The Google Play Store have been added a new application. Not in Italy, though, or at least not yet. The new application is called Play Magazine: already exists in the United States and has made an appearance in the United Kingdom. Soon could launched in our country, as well as in France, Spain and Germany, enriching the overall supply of online store of Google.Look great android
google play magazine launched

What Is Google Play Magazine

Google Play Magazine gives you the ability to subscribe to a magazine or buy a single issue. A great virtual library that allows you to read your favorite magazine directly to your smartphone or tablet. Simply download the Play Magazine application on your device by enter to the play store. The operation is the same to Google Play Music ( streaming music online ) and the others: a dedicated app through which enjoy the contents purchased and downloaded.

Play Magazine first released in the United States while in recent days has also arrived in the United Kingdom. Soon, the other countries could add to the list. According to TheNextWeb, Italy, France, Spain and Germany could be the next markets where Google opens its online store for magazines in periodicals. In Italy, Play Magazine you would add to Play Books, Play Music and Play Store dedicated to books, songs, games and applications.

Go to play Magazine to see the explanation from google.
To think of it, it still lacks something. Yes. Miss the Google Play Movies, perhaps the most interesting feature of store, since it gives you the ability to buy and rent movies and watch them directly from your mobile device. If the time of Magazine may have been come, for Movies is unable to give a date of the release and the only chance is to hope that Google does not take too long to be released globally.

Wednesday, 4 September 2013

How To Install Cyanogenmod 10 On Samsung Galaxy S I9000

In this guide you will find the latest cyanogenmod 10.1 on your Samsung galaxy S I9000 phone. It is now a few days that we're very dedicated to the famous CyanogenMod Rom that in this last period is being talked about much if, thanks to the cyanogenmod developers that are bringing forward and the development and finally they bring the CM10.1.Look great android
install cm10.1 on galaxy s i9000

Supported devices are still in limited list, but slowly the team is updating the list and all or almost all, the supported devices by the previous update will be embraced by the version of Android 4.2.1. But now we want to get into a particular device, the famous Galaxy S I9000, who was among the first to receive the update to the new CyanogenMod 10.1. Today, as in the past we will try to explain in a few steps how to install cm 10.1 on Galaxy s I9000.

PREREQUISITES

Let's start with the classic "must haves" to allow you to install this Rom on your device.
  • You must already have root acces to your phone
  • As usual you will need install the Cwm Recovery to Flash the cyanogenmod 10, you dan find the tutorial in install cm7.2 on galaxy s
  • Download CyanogenMod 10.1 for Galaxy S I9000 = http://adf.ly/Gzuo8
  • Download Google App for CyanogenMod 10.1

After your have do all the the prerequisites now lets start the tutorial


How To Install Cm 10 On Galaxy S I9000

  1. The first step is to move on the cm 10.1 and gapps file to SD Card
  2. After that enter into Recovery Mode. By hold the Volume Up + Volume Down + Power buttons together until the screen turn on
  3. We carry out the three wipe that will allow us to install the Rom cleanly, then select "Wipe data/factory" then select the "Wipe cache" and finally we enter in the menu "advanced" and select"Wipe dalvik".
  4. Now we proceed with the installation of the Rom going to menu "install zip from sd card > choose zip from sd card" and select the previously downloaded 10.1 CM.
  5. After complete Now install the Google Apps, going first in the section "install zip from sd card > choose zip from sd card", but this time select the file dedicated to Gapps — gapps-jb-20121212-signed.zip
  6. Once you have completed this setup we are ready to restart the device and use the new 10.1 CM. Then Reboot system now 

Conclusion From The Installation
We have once again arrived at the end of our guide, we can certainly tell you that you will notice an increase from the fluidity of the device, you will get the changes that bring the new Android update, including the coolest thing and the new customization.

Sunday, 1 September 2013

Android Application To Backup And Restore SMS

Here you will find android apps that will allow you to back up SMS and restore it again. Are you often find tutorial when you want to root, update, or customize your phone you must backup your sms to make it save? Below we will try to give review from one of android application that exist on playstore which can backup sms on android phone. Look great android

This application is very useful for everyone who wants to backup SMS on your SD card. In fact, it happened to all of having to erase important messages or held in particular, due to the slowness of the editor passed a number of messages. Now you can store your conversations on your SD card, restore them at any time, send backups via email or read it directly from your pc.

You can schedule a time for your backup and it will automatically choose to do that only for some conversations directly from your application and delete all messages already stored.


You SMS Backups are saved as .XML easily translatable into other text formats.

Unfortunately works only for Sms and Mms.

Warning

some versions of firmware of the Droid X and Droid 2 when restoring backups have problems with the exact time of the messages.

The application is downloadable for free from the Android Market, takes up very little space and is very light and constantly updated, is it really worth it.

SMS Backup & Restore
Download application, you can get it from play store free, without charge
Download from Google Play Store
Here are some screenshots of the application
download android apps to backup sms

Another app that you maybe will like : install google maps offline on android

Here you go, I hope with this application now you can save and backup your sms to your sd card, and restore it whenever you want. See you in another android guide post